
Have you experienced deep ache or sharp pain in the shoulder when doing overhead activities like reaching into a cabinet or serving a tennis ball? Do you feel weak when lifting heavy items? Does the pain occasionally radiate into your arm?
You may have a type of cartilage tear in your shoulder called a SLAP injury!
If an orthopedist suspects a SLAP tear, you will be referred to physical therapy for about six visits. The good news? Some SLAP tears can heal with conservative treatment! The bad news? Some do not heal and may need further treatment.
If there is no progress during physical therapy, your orthopedist may decide to perform an MRI. If the MRI confirms a SLAP tear, you might need to undergo a SLAP repair. Sometimes, SLAP tears are associated with other injuries like rotator cuff tears, which are injuries to the stabilizing muscles of the shoulder. Your orthopedist will develop a treatment plan to address that, too.
So what exactly is a SLAP tear and how is it repaired and what does recovery look like?
Shoulder Anatomy and SLAP Tears
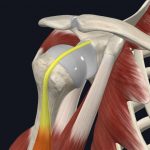
A SLAP tear stands for a superior labral tear in the anterior posterior direction. That means the cartilage on the surface of your shoulder joint has torn or frayed from front to back.
The cartilage (known as the glenoid labrum) in the shoulder joint to help improve stability with movement. A stable shoulder joint is less prone to ligament sprains, muscle strains, and dislocation.
However, part of your biceps muscle attaches to the top portion of this cartilage, creating a vulnerable spot during repetitive activities. Tearing and shearing to this area is called a SLAP tear, and it’s very common.
-
- Biceps attachment to the labrum (highlighted)
-
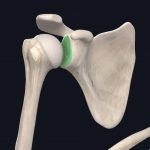
- Labrum (highlighted)
Symptoms of a SLAP tear include less shoulder flexibility, generalized weakness, locking, popping, clicking, or grinding. In some cases, you may feel that the shoulder may “pop” out of place, although this feeling is more common with a Bankart tear, which is a different type of cartilage tear in the shoulder.
SLAP tears are often diagnosed with rotator cuff tears. They can both occur from the same activities, like rapid and repetitive shoulder movements, falling, and heavy lifting motions.
Read a more in-depth explanation of SLAP tears to understand the anatomy.
Who Needs A SLAP Repair?
Severity of the SLAP tear is graded based on the degree of detachment of the labrum from the glenoid, and associated biceps trauma.
- Type 1: The labrum shows signs of wearing or fraying, but functions normally. This is common in most middle-aged individuals and older.
- Type 2: The labrum and biceps tendon are torn away from the shoulder socket. This is the most common.
- Type 3: The labrum and biceps tendon are detached from the glenoid, and the labral tissue is caught in the shoulder joint.
- Type 4: Tearing in the biceps tendon occurs.
Individuals with Type 1 and some Type 2 injuries can be rehabilitated with physical therapy. Those with Type 3 or Type 4 tears may need surgery, as the tear is more involved and will be more difficult to rehabilitate conservatively.
What to Expect on Your Surgery Day
The severity of your injury and medical history will influence your surgeon’s decision to do an inpatient or outpatient surgery. Inpatient surgeries happen in a hospital and require you to stay overnight. Outpatient surgeries also happen at a hospital or satellite surgical center, but you’ll likely return home a few hours after the procedure.
Most SLAP repairs are outpatient procedures. Doctors perform this arthroscopically and minimally invasive. Your surgeon will make several small incisions surrounding your shoulder and insert a camera or arthroscope to be able to visualize the tissues needing to be repaired. You’re left with small scars that aren’t very noticeable.
Sometimes a SLAP repair is more involved depending on the type of tear and other present injuries. The surgeon’s approach may differ in these cases.
- Mini-open procedures are performed partially by arthroscopy, but also making a slightly larger incision for improved visualization of the working area.
- Fully-open procedures are when the surgeon makes a large incision (usually in front of the shoulder) to visualize the working area.
Incisions are closed with stitches or glue. Steri-strips or other bandages are placed over them for protection and to prevent infection. Do not remove the steri-strips or bandages unless otherwise instructed by your surgeon. They will generally fall off on their own as the adhesive wears away over the course of a few weeks.
Post-Surgical Expectations of a SLAP Tear
You should be aware of the signs of infection. Some bleeding at the incisions is normal, but monitor for excessive bleeding and abnormal discharge (yellow, green, smelly, or pus-filled) coming from the surgical wounds. Your surgical site and surrounding areas will be red and swollen, but excessive redness, heat, or discomfort may be indicative of a blood clot. If you notice shortness of breath or extreme redness/warmth of the surgical area, follow-up with your surgeon as soon as possible to avoid further complications.
Depending on the surgery, you may need to wear a sling to protect the repaired tissue. Your surgeon will provide instructions regarding when to wear the sling and for how long to allow for proper healing. You may wear it for only a few days, or you could wear it for four to six weeks. It’s important that you follow instructions closely to protect the surgery or the repair will fail.
Luckily, the average success rate of SLAP repairs (without other injury) is 85-95%. Most patients to return to reaching and lifting overhead, throwing, and participating in overhead sports.
Be sure to ask your surgeon when you need to start your physical therapy at JACO Rehab so you can schedule your evaluation within a few days of the surgery. Yes, you might visit us the same week!
SLAP Repair Protocol
There are several rules after surgery to ensure your repair heals correctly. It is important to adhere to your protocol to prevent re-injury or complications. Each surgeon will have his own specific protocol depending on the severity of your injury, but generally, the protocol will follow these time ranges.
- Phase 1 (pre-operative): Before surgery, patients might attend a prehabilitation session to prepare you and your shoulder for what’s to come. This may involve some pre-surgical exercises. Surgical outcomes improve when you work on shoulder flexibility and strength prior to the surgery day. It also provides an opportunity for you to understand the healing process and what to expect.
- Phase 2 (week 0-4): Patients start physical therapy a few days following surgery unless otherwise indicated by your surgeon. The goal of this phase is to protect the surgical area, promote healing, and encourage light mobility mostly by your therapist. Your therapist will focus on gentle motion to encourage healing, but you will be doing minimal to no active exercises that stress the surgical area. During this phase, it is important to refrain from lifting, pushing, pulling, and moving your surgical shoulder on your own.
- Phase 3 (week 4-8): The goal of this phase is to regain shoulder movement and begin strengthening. Exercises will focus on shoulder flexibility and rotator cuff stability to aid in returning to patient’s prior level of function. Continue to refrain from heavy overhead lifting, throwing, and repetitive movements. Strengthening exercises may include postural activities with resistance bands, light shoulder strengthening, and scapular control-focus.
- Phase 4 (week 8+): The goal of this phase is to work on progressive strengthening and functional movements such as lifting, pushing, and pulling as tolerated. Your mobility should be normal at this point, and you’ll start sport-specific exercises if it applies to you. You’ll likely stop physical therapy around week 12.
Remember: Your specific timeline for healing will on the complexity of your surgery. It is important to adhere to your surgeon’s guidelines to prevent reinjury or irritation of the repaired tissue.
Healing Timeline: Big Picture
Generally, you are back to performing normal daily activities within 3-4 months, but total return to recreation or sport may take between 6-12 months. Your physical therapist will help to progress your exercises during the different phases of healing, to keep you on track for the fastest and safest recovery possible.
Even if your pain is minimal, do not progress too quickly! Surrounding muscles and the repaired labrum follow a specific healing process. You shouldn’t push it, even if you’re feeling great.
Patience is key to successful return to normal function and get you back to to the things you love!
What to Expect at Physical Therapy
Your first physical therapy session will focus on evaluating the shoulder, taking passive range of motion measurements only. We don’t assess your active reach and strength until later.
Things to keep in mind for your first session:
- Arrive early to fill out any necessary paperwork and have your ID and insurance card ready.
- Wear athletic clothing, and if comfortable, something sleeveless so your physical therapist can assess the tissues and joints hands on as well as see the quality of your motion.
- Think about your goals.
- Ask a lot of questions! We are here to help you understand every step of the way, making you a key player in your own rehab process.
At JACO Rehab, our sessions include hands-on manual therapy to assess and address any tissue or joint mobility restrictions at the affected area. Therapists also prescribe stretches and exercises specifically for you, but it’s your job to perform them. Think of it like a doctor prescribing medicine, and you’re taking it daily to help you heal.
Your physical therapist will regularly assess your mobility and strength to ensure your hard work is paying off!
Sample Exercises after a SLAP Repair
Here are two examples of exercises that a physical therapist may prescribe after a SLAP repair.
Be careful trying exercises on your own, as they may not adhere to your specific post-operative protocol. You should ask your surgeon if these exercises are appropriate before you perform them, or just wait until you see a physical therapist. These are just examples so you’re aware of what’s to come.
If you want to perform these, get the correct repetitions and sets from your doctor or physical therapist.
Shoulder External Rotation Stretch
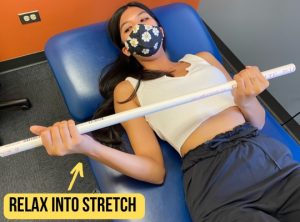
This movement should be passive, which means your surgical arm will relax into it. Make sure to keep your elbows tucked toward your side. Your non-surgical arm will push the surgical arm to the point of pain, but not past it, especially in the early phases.
Table Flexion Stretch
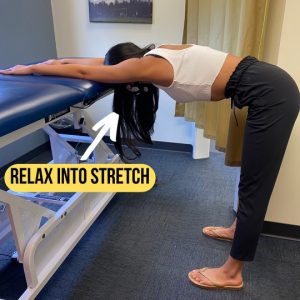
This passive stretch emphasizes the range of motion required for overhead activities. You can perform this by propping your arms on a table, counter, or shelf. Keep your shoulders relaxed. You’ll bow down which causes your shoulders to stretch overhead without actively moving them. Avoid pushing into “pinching” or sharp pain at the top of your shoulder.
Reach Out
We wish you the best of luck with your recovery. To schedule an appointment with use please call (808) 381-8947 or visit our website for more information about our therapists and locations!
Written by Kristen Shimabukuro, DPT