
If you’re considering a hip replacement, maybe the following sounds like you…
You’re having severe pain and stiffness in your hip after a car or sports-related injury, fracture after a fall, or just with normal joint wear and tear. Maybe you find that you can’t sleep throughout the night because of pain in your hip, sit for extended periods to work at your desk, or even put on your shoes and socks.
Perhaps you have decided to schedule an appointment with your primary care doctor, and they have referred you to an orthopedist. Upon examination and/or an x-ray at the doctor’s office, the orthopedist informs you that you have end-stage arthritis, or joint inflammation.
The orthopedist prescribes anti-inflammatories and/or gives you a steroid or lubricating injection. It helps take the edge off, and some feel complete relief. But in your case, after several months, the severe pain and stiffness returns.
You try physical therapy, and although it decreases the pain and allows you to move better, the severe stiffness and pain continue.
When can you get back to golfing, running, surfing, hiking, or playing with your kids/grandkids?
What’s next!?
You follow-up again with your orthopedist, and at this point they recommend a total hip replacement (THR) or partial hip replacement (PHR).
So, what is a hip replacement and how can it help you get back to doing the things you love?
What is a Hip Replacement?
A THR or PHR is a surgical procedure performed by an orthopedic surgeon to replace damaged bone and cartilage, or the cushion between your joints. Your doctor may also refer to this procedure as a total hip arthroplasty, frequently abbreviated as a THA (total hip arthroplasty), or HA (hemiarthroplasty).
During a THA, both the top of the thigh bone (femoral head) and the socket of the pelvic bone (acetabulum) with prostheses. During an HA, only the femoral head is replaced with a prosthesis.
Depending upon the degree of cartilage or bone damage, you and your doctor will decide whether a total or hemiarthroplasty is right for you.
Who Should Have a Hip Replacement?
Individuals with chronic moderate-to-severe pain, stiffness, inflammation and swelling may be candidates for a hip replacement. These individuals include those who do not respond to conservative management such as steroid or lubricating injections, anti-inflammatories, other surgeries, or physical therapy.
Children born with congenital disorders such as hip dysplasia, avascular necrosis, slipped capital femoral epiphysis, legg-calve-perthes disease, or cerebral palsy may have related hip disorders may also be candidates for a hip replacement.
Hip replacements are commonly performed in individuals 50 to 80 years of age. However, they have also been done successfully in juveniles and young adults. With proper care after a hip replacement, including physical therapy, you can get back to the things you love doing, with a recovery time of usually 2-3 months.
At this point, you and your doctor have decided a hip replacement is right for you. Congratulations, you are one step closer to
Here’s what you need to know before your surgery.
Hip Joint Anatomy
The hip joint is a ball-and-socket joint made up of the ball (head of the femur, or upper end of the thigh bone) and socket (acetabulum of the pelvic bone). It is the job of the labrum, or cartilage, between the head of the femur and acetabulum to act as a shock absorber, provide joint stability, and provide lubrication to allow for smooth rolling and gliding of the bony surfaces on top of one another.
Without sufficient labral surface area, space between the bony surfaces, excessive swelling (inflammation), or lack of blood supply to the femoral head caused by certain conditions, like arthritis. Usually, people will feel pain, stiffness, and limited mobility.
-
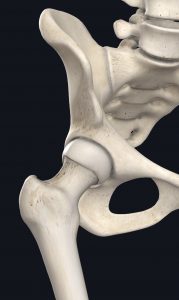
- Hip Joint: Ball and Socket
-
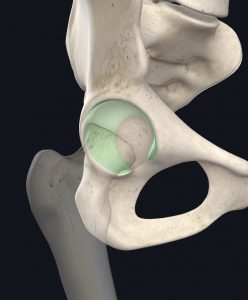
- Labral Area of the Hip
Images courtesy of Complete Anatomy
The hip joint also has several other types of tissues that help to provide stability to the hip, and therefore prevent wear and tear on the joint. Ligaments, which connect bone to bone, prevent excessive motion of the hip joint which may result in dislocations, fracture, or other injury.
Muscles that bend, extend, and rotate the hip and their tendons, which attach the muscles to the bony surfaces of the hip, also help to accelerate, decelerate, and control movement to prevent injury. Damage or weakness to any of the stabilizing structures of the joint can cause excessive wear and tear.
-
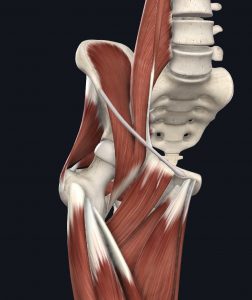
- Deep Hip Muscles: Front
-
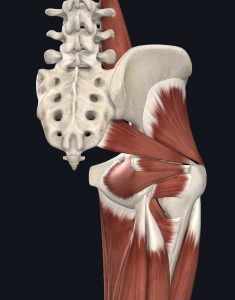
- Deep Hip Muscles: Back
Image courtesy of Complete Anatomy
Now that you understand the anatomy of the hip joint, here’s what to expect before, during, and after your surgery!
What to Expect Before Your Hip Replacement Surgery
Besides learning as much as you possibly can about your surgery beforehand (specifics of which we will cover below), previous patients who have gone through the process cannot stress enough the importance of attending prehab!

Prehab is typically a single physical therapy visit, but it can be more depending upon your situation. A licensed physical therapist will assess your hip range of motion and strength among other things, provide education on how to get around safely after surgery, and determine which exercises you will need to perform before returning for your first physical therapy session after the procedure (post-op).
If you want to learn more about prehab, call our office for more information!
It’s Surgery Day!
Depending upon your surgeon, you may have an outpatient or inpatient procedure. Outpatient procedures will have you home the next day, while inpatient procedures require you to remain in the hospital for a few days. Check out Island Orthopedics or Minimally Invasive Surgery Hawaii for more information.
Make sure you know what to expect so you can plan ahead. What type of assistive device do you need as you leave the hospital? Will you need help when you get home? Find out as much as you can so that you can bring this up to your therapist during your prehab appointment.
Your surgeon will determine which approach is most appropriate for you depending on your presentation. Precautions vary between approaches, so make sure you understand your limitations after surgery to protect the implant.
There are three main approaches seen in the clinic, some more common than others.
Types of Total Hip Replacement Approaches
1. Anterior approach – This incision will typically run vertically in the front of the hip, but can sometimes run horizontally. This approach allows the surgeon to separate the musculature in the front of the thigh to get to the joint.
This approach tends to have the least precautions, but there still are some to protect the implant from dislocation while you heal. Avoid reaching your hip backwards (extension) and rotating the hip outward (external rotation) during the first several weeks after surgery.
Examples of movements to avoid during healing: backwards walking or passing a soccer ball with the inside of your foot.
2. Posterior approach – This incision will be curved running from the side to the back of the hip. The surgeon must cut through some musculature in the buttox. This allows the surgeon a great view of the hip.
This approach does come with additional movement precautions after surgery to protect the new joint from dislocating while you heal. Avoid crossing your legs, turning your toes in, and bending the hip more than 90 degrees.
Examples of movements to avoid during healing: crossing your legs when sitting, pivoting on surgical leg, or sitting on a very low surface (like a small stool).
3. Lateral approach – As with the posterior approach, the surgeon will have a better/larger view of the hip by cutting through some glute muscles. Precautions will be the same as a posterior approach.
Precautions are typically maintained anywhere from 6-12 weeks depending upon your surgeon’s protocol.
Depending upon your individual circumstances, the type of prosthesis and cemented versus uncemented fixtures may also vary. The prosthesis usually consists of a metal stem and ball for femur, a metal socket replacing the acetabulum, and a metal, plastic, or ceramic spacer between the two surfaces to allow for a smooth gliding surface.
Cemented/Press Fit vs. Uncemented Hip Prosthesis
1. Cemented/press fit prosthesis – Uses a bone cement to attach the prosthesis to the bone. These are done in limited instances in individuals with severe osteoporosis/arthritis, previous bone irradiation, or a wide femoral canal as bone growth onto the prosthesis or fit may be limited. After surgery, individuals are able to bear full weight on the leg immediately.
2. Uncemented prosthesis – This is the most common prosthesis used in the United States. This allows bone to grow on/in the prosthesis itself thereby fixating it in place. After surgery, individuals are usually weight-bearing as tolerated (WBAT) on the leg due to the healing time required for bone to grow on/in the prosthesis which can take up to 3 months.
Hip Replacement Recovery Time
Depending on what your surgeon sees fit, you will go home with a bandage and stitches, staples, glue, or tape strips over the surgical incision. Your doctor (or their assistant) will give you further instructions on how to care for the bandaging at your first follow-up appointment. If you have stitches or staples, your doctor or their assistant will remove them usually within 10 to 21 days after your surgery.
You will typically develop a scar at the incision site after surgery, which is completely normal. Your physical therapist can show you how to perform scar tissue mobilization to decrease its appearance and ensure the tissue is moving properly after the incision site has fully healed, usually around 6 to 8 weeks after surgery.
It is always important to monitor your incision site and leg for any signs of infection or blood clots/deep venous thrombosis (DVT). Your physical therapist will educate you on things to look out for at your prehab appointment and monitor you during the course of care.
You may require use of an assistive device to get around like a cane, crutches, or a walker. You may need it for 6 or more weeks after your surgery due to pain, stiffness, and weight-bearing precautions. Most individuals are able to walk on their own about 4 to 8 weeks after surgery. At your prehab appointment, your physical therapist will instruct you on correct usage of your assistive device.

Following up with a physical therapist after surgery, usually within the first week, is crucial to ensure you get back to walking normally after surgery. You’ll also be learning how to get back to normalized stair climbing, prolonged walking tolerance, squatting, and any specific goals you may have. People usually attend physical therapy for up to 3 months.
It is very normal to experience mild pain, stiffness, and swelling after the surgery, which may affect your ability to find a comfortable sleeping position. It is normal for swelling to linger for 3 to 6 months. At physical therapy, you will learn how to manage the swelling effectively and how to find a comfortable sleeping position. Pain and swelling get better if you stay consistent with your prescribed activities!
Get ready to work toward recovery as soon as you begin physical therapy. Let us help you.
How Long Do Hip Replacements Last?
Hip replacements can last quite a while, but most surgeons caution younger adults from receiving the procedure because they may need it replaced again at least once in their lifetime. A typical hip replacement lasts between 10 to 25 years, depending upon an individual’s activity levels.
Exercises to Start Learning Now
Your physical therapist will choose and progress individualized exercises that target your specific limitations. Two common exercises prescribed at the onset of your care to be aware of are glute sets and quad sets.
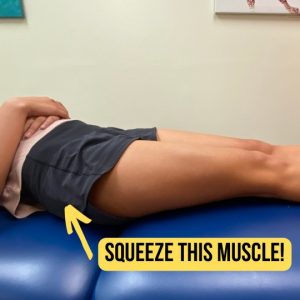
1. Glute sets – “Squeeze your butt”. Work on strengthening the gluteus maximus muscle which is responsible for straightening/extending your leg, and plays a large role in your step length, squatting, and stair-climbing abilities. They can be performed lying on your back, sitting with your legs outstretched in front of you, or standing. Hold times and repetitions will vary depending upon your needs.
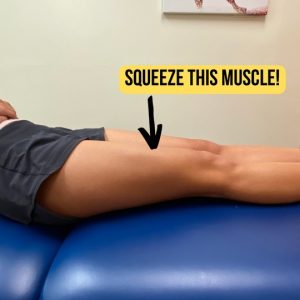
2. Quad sets work on strengthening the quadriceps (front/anterior thigh) muscle which is responsible for straightening the leg, and plays a large role in your single leg balance, squatting, and stair-climbing. They can be performed lying on your back, sitting with your legs outstretched in front of you, or standing and with/without a towel roll under your knee or ankle. Hold times and repetitions will vary depending upon your needs.
We wish you the best of luck with your upcoming surgery, and encourage you to reach out to us with any questions! Please call (808) 381-8947 or email info@jacorehab.com for more information.
Written by Jenn Lewis, DPT